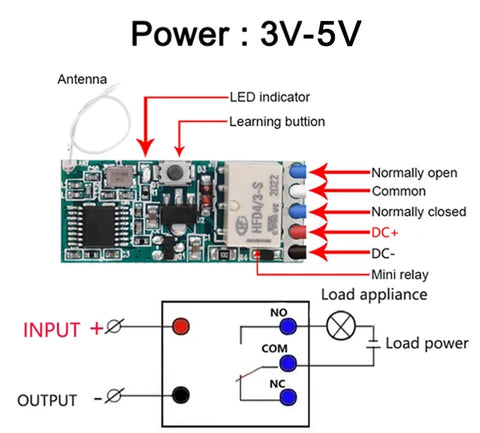
Model:KR1201MINI2-4
Click to Buy

Electrical parameters:
- Working voltage: 3-5V
- Standby current: ≈6mA (without power saving mode)
- Working current: (working current of the module itself, non-external load current) generally 5mA
- Load power: 30W, 1A/30VDC 0.3A/125VAC
- Receiving frequency: 920MHZ
- Receiving sensitivity: -100dBM
- Port output impedance: 50ohm
- Modulation type: ASK/OOK
- Support encoding format: 1527 learning code
- Learning method: key learning
- Working mode: Jog, self-locking, interlocking, clearing code, setting switch state (open or closed when switching)
- Storage quantity: Maximum storage of 12 groups of instructions.
- Working temperature: -20~80 degrees
- Dimensions: 3 * 13 * 6.8
- Weight: 4g
- Application range: motor drive, signal switch, micro control, lamp control, etc.
- Recommended solutions: 110V 30W ultraviolet disinfection lamp control (US regulations), model DIY remote control, electric lock remote switch spiritual door lock, LED lamp with remote control, etc.
Functions:
Momentary: Push the remote button, the relay connects, release the remote button, the relay dis-connects.
Toggle: Push once the remote button, the relay connects, push twice the remote button, the relay dis-connects .
Latching: Push the remote button A, the relay connects, push the remote button B, the relay dis-connect.
Pairing Instructions:
Clearing the code :
Press the learning button continuously on the receivers for 8 times, the light will flash for seven times and switch off. Code cleared, receiver rest.
Note that resetting means all your paired remote controls will need to be re-paired in order to control the receiver again.
Note that resetting means all your paired remote controls will need to be re-paired in order to control the receiver again.
Setting Momentary Mode:
Press the learning key on the Receiver once, the LED on the Receiver will flash for once then switch on.
When the LED is on, press the button on the remote control(the one you wish to control the receiver with), the LED (on the Receiver) will flash for 3 times and switch off, which indicates learning complete.
Setting Toggle Mode:
Press the learning key on the Receiver twice, the LED on the Receiver will flash for twice then switch on.
When the LED is on, press the button of the remote control(the one you wish to control the receiver with), the LED (on the Receiver) will flash for 3 times and switch off, which indicates learning complete.
Setting Latching Mode:
Note: For latching mode, in order to pair with more remote controls, you need to learn two different button, the first time learning is for ON, the second time learning for OFF.
For example: button A = ON, button B = OFF
Press the learning key(on the Receiver) 3 times, the LED (on the Receiver)will flash for 3 times.
When the LED is on, press the button on the remote control(the one you wish to control the receiver with). Press the remote button A, the LED (on the Receiver) will flash for 3 times . Push the remote button B, the LED (on the Receiver) will flash for 3 times. 3 seconds later, the LED indicator will switch off which indicates learning complete.
A = ON, B = OFF.

